NFR Strategy Hub
The NFR Strategy Hub uses AI to generate a complete Non-Functional Requirements (NFR) strategy for your application. It defines your SLAs, workload model, recommended test types, and performance thresholds — giving your team a documented baseline before performance testing begins.
Rather than manually drafting NFR documents from scratch, you provide context about your application (through issue tracker items, supporting documents, or both), answer a short questionnaire, and the AI produces a structured, ready-to-use Performance Test Strategy document.
Prerequisites
Before using the NFR Strategy Hub, ensure the following are in place:
| Requirement | Details |
|---|---|
| Perf Agent access | You must be logged in with a valid account |
| Application configured | Your application must be added via Settings → Applications |
| Context source | At minimum, either issue tracker items (Step 1) or a supporting document (Step 2) must be provided |
| Integration configured (optional) | If fetching from Azure DevOps or Jira, the relevant integration must be set up under Settings → Integrations |
The Four-Step Generation Flow
Generating an NFR strategy follows a guided four-step wizard: Fetch & Select → Add Documents → Questionnaire → Generate.
Step 1 — Fetch & Select (Issue Tracker Items)
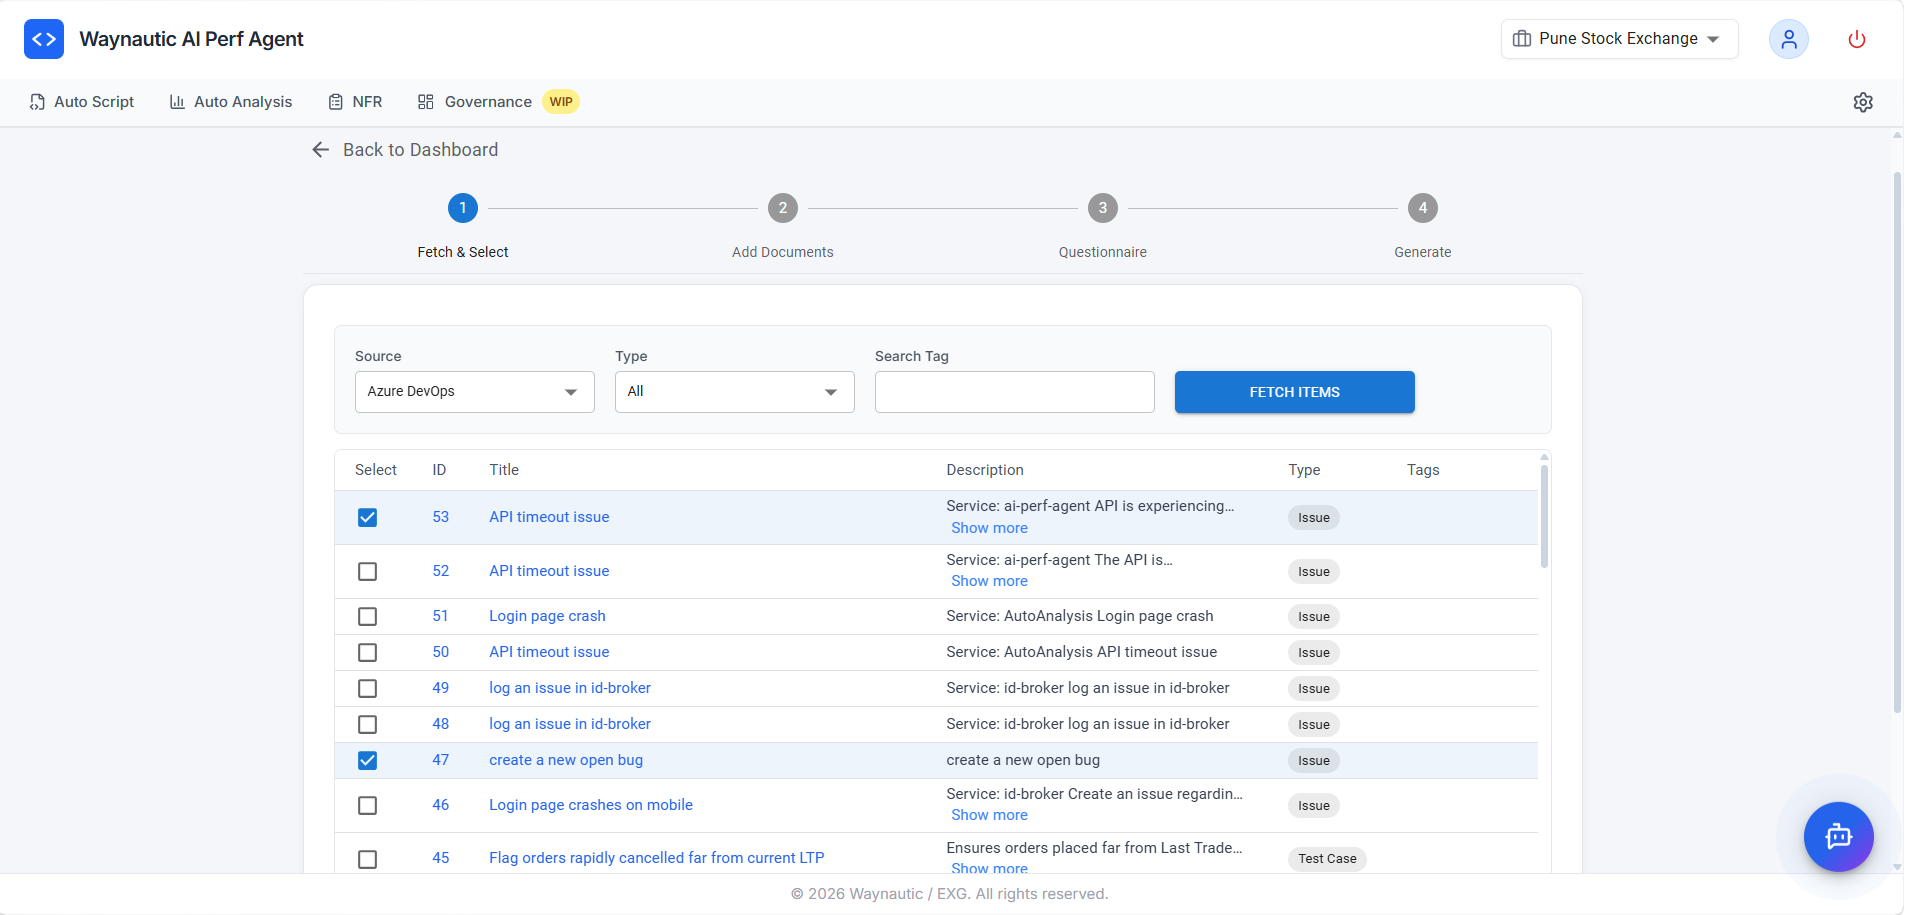
In this step, you pull work items from your connected issue tracker and select the ones that are relevant to your NFR strategy.
How to Use
- Select your Source — either Azure DevOps or Jira (depending on what is configured under Settings → Integrations)
- Choose a Type filter — options include Issues, Epics, Stories, Test Cases, or All
- Optionally enter a Search Tag to narrow the results to a specific label, tag, or keyword
- Click FETCH ITEMS — the table below will populate with matching items from your connected source
- Use the Select checkboxes to choose the items that describe the application behaviour, expected load, or business scenarios you want the NFR to address
- Click Next to proceed to Step 2
What Types of Items to Select
The AI uses the selected items to understand the application's functional scope — which transactions matter, what the business expectations are, and where performance is critical. Select items that describe:
- Core user journeys or business-critical transactions (e.g., Login, Checkout, Report Generation)
- Known performance issues or bottlenecks logged as issues or bugs
- User stories with volume or concurrency expectations
- Epics or features under active development that require performance coverage
You do not need to select every item. Focus on items that are representative of the transactions and load scenarios you intend to test. The AI generates more targeted SLAs when the input is focused rather than exhaustive.
Step 1 and Step 2 are complementary — you can use one or both. If your issue tracker does not have relevant items, skip this step and rely on documents in Step 2 instead. At least one of the two steps must provide context for generation to proceed.
Step 2 — Add Documents

In this step, you can upload supporting documents that give the AI additional context about the application. This is particularly useful when your issue tracker items do not fully describe the system's architecture, expected usage, or existing performance requirements.
Supported File Types
.pdf, .doc, .docx
What Documents to Upload
| Document Type | Examples |
|---|---|
| Architecture or design documents | System design specs, API documentation, infrastructure diagrams |
| Existing NFR or SLA documents | Prior performance requirements, service level agreements |
| Business requirement documents (BRDs) | User volumes, expected peak loads, business KPIs |
| Test strategy or test plan documents | Previous performance test strategies or results |
| Runbooks or operational docs | Capacity planning, scaling policies |
How to Upload
Click the upload area or drag and drop one or more files into it. Uploaded files appear listed under Attached Files below the upload zone. Click Next to proceed to Step 3.
Even a single well-structured BRD or architecture document can significantly improve the quality and accuracy of the generated NFR. The more context the AI has about the application's expected behaviour and constraints, the more specific and actionable the output will be.
Step 3 — Questionnaire
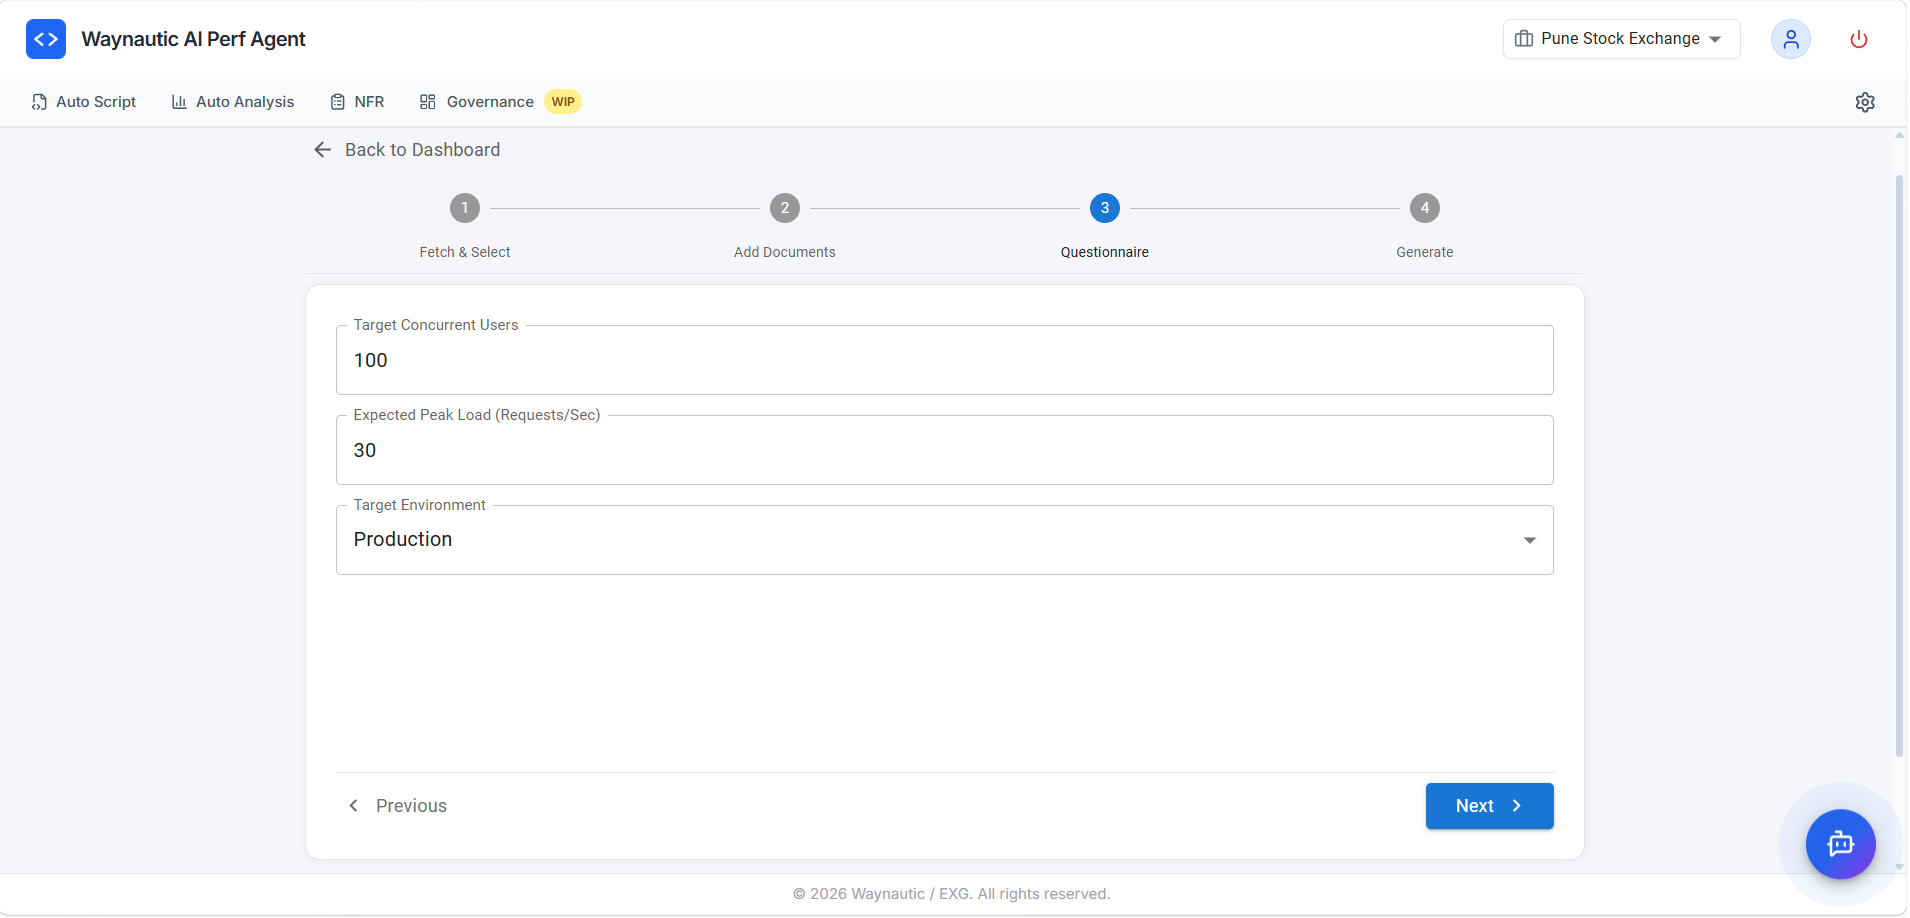
The Questionnaire step captures the core load parameters that anchor your NFR strategy. These values directly inform the workload model and SLA thresholds in the generated document.
Fields
| Field | Description |
|---|---|
| Target Concurrent Users | The number of simultaneous users the system should support under normal or peak load |
| Expected Peak Load (Requests/Sec) | The maximum number of requests per second the system is expected to handle at peak |
| Target Environment | The environment the NFR applies to — options typically include Dev, QA, UAT, Staging, or Production |
All three fields are optional — if you leave them blank, the AI will infer appropriate values based on the context provided in Steps 1 and 2. However, providing these values produces more accurate and targeted SLA thresholds.
If you are unsure of the exact numbers, use your best estimate based on current production traffic or business projections. The generated strategy can always be refined after reviewing the output.
Click Next to proceed to the final step.
Step 4 — Generate
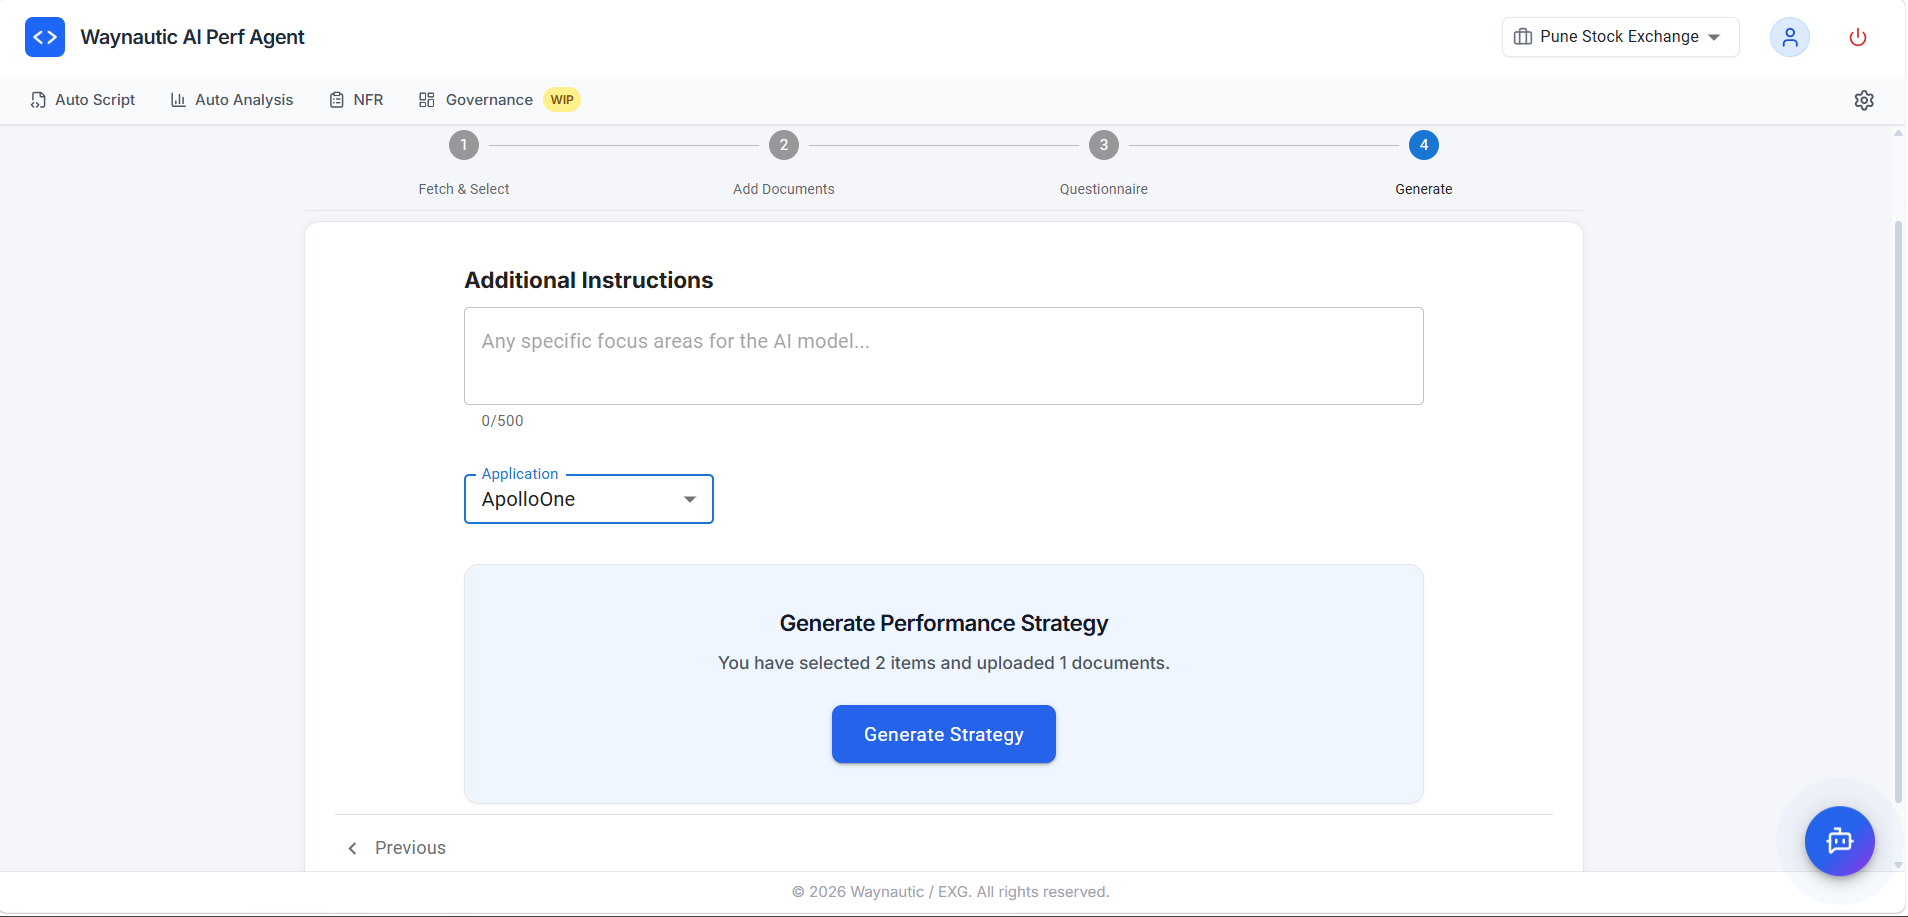
This is the final step before generation. You select which application the NFR belongs to and optionally provide any specific focus areas for the AI.
Fields
| Field | Description |
|---|---|
| Additional Instructions | Free-text field (up to 500 characters) for any specific focus areas, constraints, or emphasis you want the AI to apply — for example, "Focus on the payment gateway transactions" or "Prioritise mobile API endpoints" |
| Application | Select the application this NFR strategy applies to. Applications are managed under Settings → Applications and determine how strategies are grouped across the platform |
The summary line confirms how many items and documents you have provided — for example, "You have selected 3 items and uploaded 1 document."
Click Generate Strategy to trigger generation.
Generation may take up to a minute depending on the amount of context provided. The strategy will appear in the NFR dashboard once complete.
What the Generated NFR Contains
Every strategy document produced by the NFR Strategy Hub follows a consistent structure:
| Section | Description |
|---|---|
| Introduction & Objectives | Purpose of the performance test strategy and key objectives (scalability, reliability, SLA compliance, bottleneck identification) |
| Scope | In-scope transaction journeys and out-of-scope items (functional testing, penetration testing, long-duration endurance) |
| Non-Functional Requirements Mapping | A table mapping each selected Epic/Story/Issue to its key NFRs and acceptance criteria |
| Test Approach | Recommended test tool, test types (Load, Stress, Soak, Scalability), and workload distribution across transactions |
| Workload Model | Per-transaction breakdown of target volume, concurrency, SLA response time targets, and priority |
| Test Data Requirements | Guidance on test account volumes, data refresh strategy, and production-like data usage |
| Execution Plan | A phased test plan — Baseline, Load Test, Peak Test, Stress Test, Soak Test — with ramp-up, duration, ramp-down, and success criteria for each phase |
| Monitoring & Observability | System metrics (CPU, Memory, Disk I/O), application metrics (response time percentiles, TPS), database metrics (query time, cache hit ratio), and recommended tools |
| Entry & Exit Criteria | Conditions that must be met before testing begins and before testing is considered complete |
| Risks, Assumptions & Constraints | Known risks (environment drift, external dependencies), assumptions, and constraints (testing window, budget) |
| Deliverables | Full list of expected outputs including the strategy document, test scripts, daily summary reports, and final performance report |
| Team & Responsibilities | Roles (Performance Test Lead, Test Engineers, DevOps Engineer, Application SME, Project Manager) with responsibility assignments |
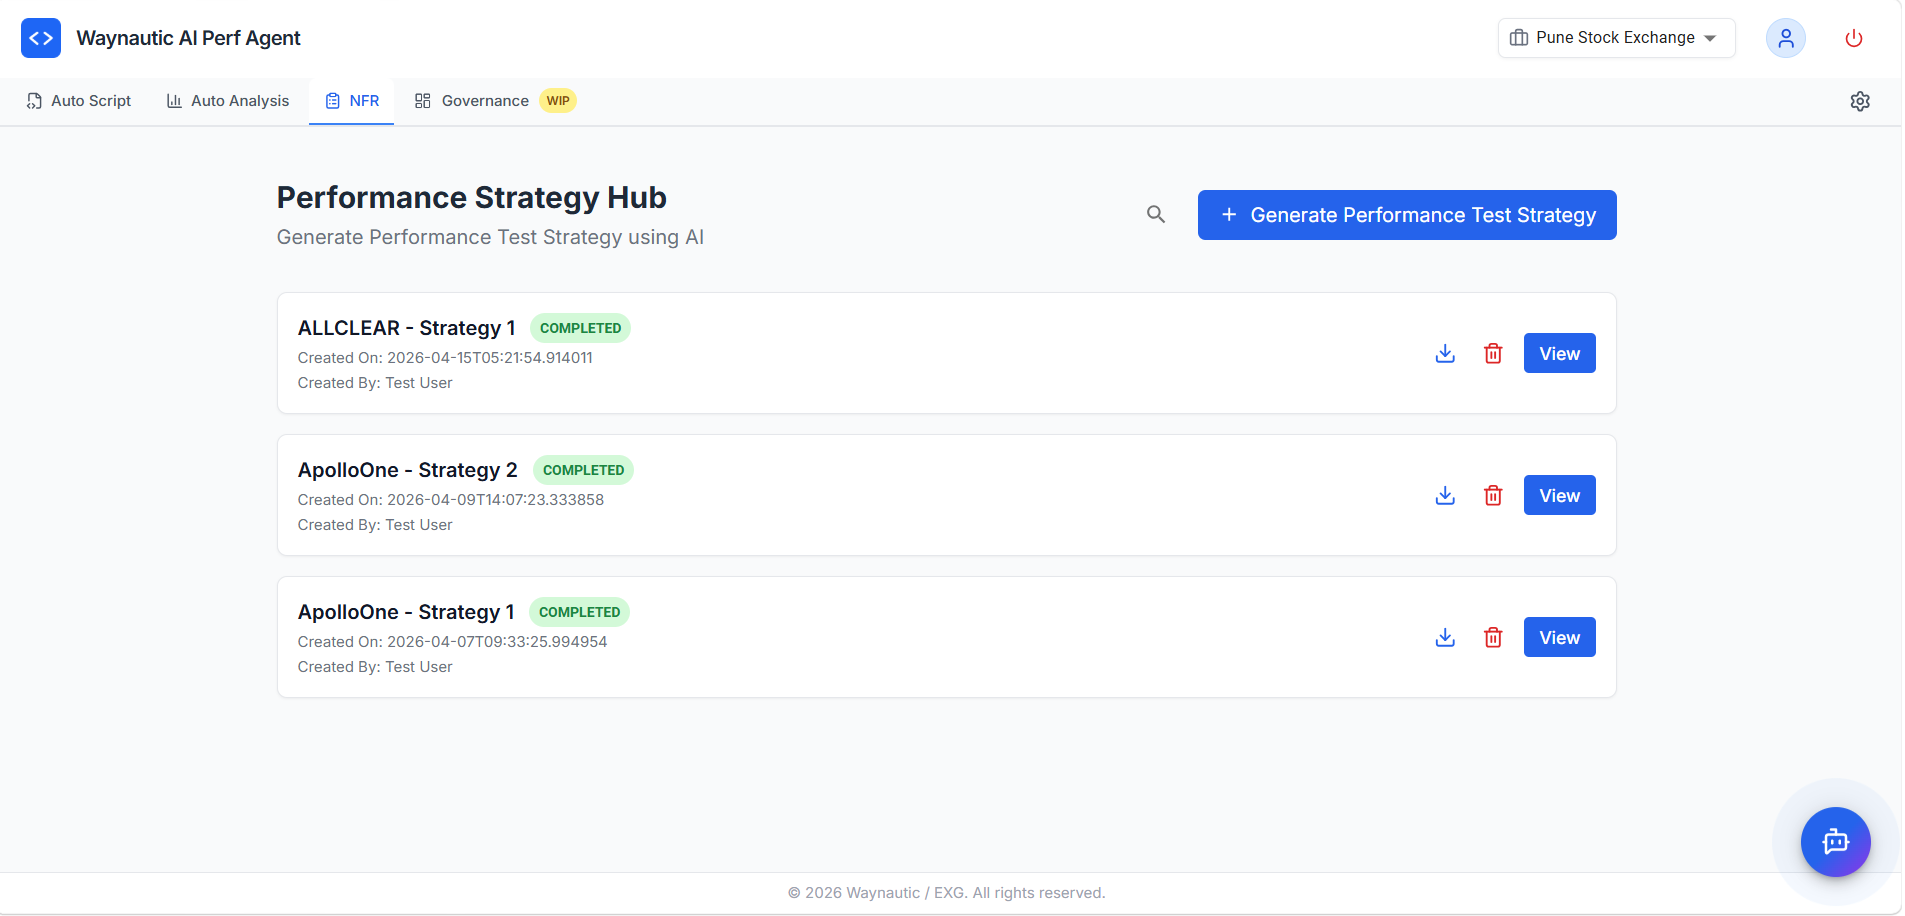
Viewing and Managing Generated Strategies
After generation completes, your strategy appears in the NFR Strategy Hub dashboard.
The NFR Dashboard
Each strategy card displays:
- Strategy name (derived from the application name and sequence)
- Status badge —
COMPLETED(green) - Created On — timestamp of when the strategy was generated
- Created By — the user who triggered generation
Actions
| Action | Description |
|---|---|
| View | Opens the full strategy document in a formatted read-only view |
| Download (⬇️) | Downloads the strategy as a .pdf file |
| Copy | Copies the full strategy content to your clipboard (available inside the View screen) |
| Delete (🗑️) | Permanently removes the strategy — download it first if you intend to keep it |
Reviewing and Using the Output
The generated document is a strong starting point. We recommend the following after generation:
Review the Workload Model — Confirm that the transaction names, target volumes, and concurrency figures align with your actual expectations. Adjust SLA thresholds if they differ from your organisation's agreed standards.
Cross-check the NFR Mapping — Verify that the items selected from your issue tracker have been correctly interpreted. If a transaction is missing or misrepresented, regenerate with more specific items or clearer additional instructions.
Share with Stakeholders — Use the Download or Copy action to distribute the document for sign-off before testing begins. The strategy is intended to serve as the agreed performance baseline between engineering, QA, and business stakeholders.
Feed into Auto Analysis — Once approved, the SLAs and workload model defined in the strategy become the benchmarks against which your test results in Auto Analysis are evaluated.
If the generated strategy is missing specifics — for example, the SLAs are too generic or the workload model does not reflect your application's actual transaction mix — provide more targeted input: select fewer, more relevant issue tracker items, upload a BRD or architecture document, and use the Additional Instructions field to steer the AI toward the areas that matter most.